P.A.S.S
Building a Dual-MCU BadUSB for Automated Server Management (RPi Pico + Pro Micro)
Introduction
BadUSB devices, often disguised as innocuous USB drives, can execute pre-programmed keystrokes on a target machine, making them powerful tools for automation and penetration testing. This project takes the concept a step further by employing a dual-microcontroller setup to overcome hardware compatibility challenges, specifically for automating tasks on legacy server hardware.
This project addresses a significant challenge in IT infrastructure management: automating the factory reset process for a large fleet of HPE Gen8 and Gen9 servers. The solution leverages a unique dual-microcontroller (MCU) architecture, combining the power of a Raspberry Pi Pico with the robust HID capabilities of an Arduino Pro Micro (or Leonardo) to create a highly effective BadUSB device.
The Challenge: HPE BIOS and USB HID
The primary hurdle encountered was the specific behavior of HPE Gen8/Gen9 server BIOS. During the boot sequence, these servers are highly selective about which USB Human Interface Devices (HIDs) they recognize as a keyboard. While the Raspberry Pi Pico is an incredibly versatile microcontroller, its native USB HID implementation was not consistently recognized by these particular server models. This meant that a standard Pico-only BadUSB solution wouldn’t work for navigating BIOS menus and executing commands.
The Dual-MCU Solution
To overcome this limitation, a two-pronged approach was devised:
- Raspberry Pi Pico (The Brain): This MCU handles the user interface, SD card reading, and parsing of DuckyScript payloads. It manages the menu navigation via physical buttons and displays information on an OLED screen. Crucially, it communicates the parsed commands to the second MCU via a serial (UART) connection.
- Arduino Pro Micro (The Executor): Based on the ATmega32U4 microcontroller, the Pro Micro is renowned for its excellent and widely recognized USB HID capabilities. It receives commands from the Pico via serial and then emulates a standard USB keyboard, executing keystrokes on the target server. This ensures compatibility even with the restrictive HPE BIOS.
This architecture effectively separates the complex UI and file management logic from the critical HID emulation, ensuring reliability and broad compatibility.
What is DuckyScript?
DuckyScript is a simple scripting language designed for USB Human Interface Devices (HID) that emulate a keyboard. It allows for the creation of sequences of keystrokes, delays, and commands that can be executed rapidly on a target machine. This project uses DuckyScript-like .txt files to define the automation sequences.
Wiring Diagram
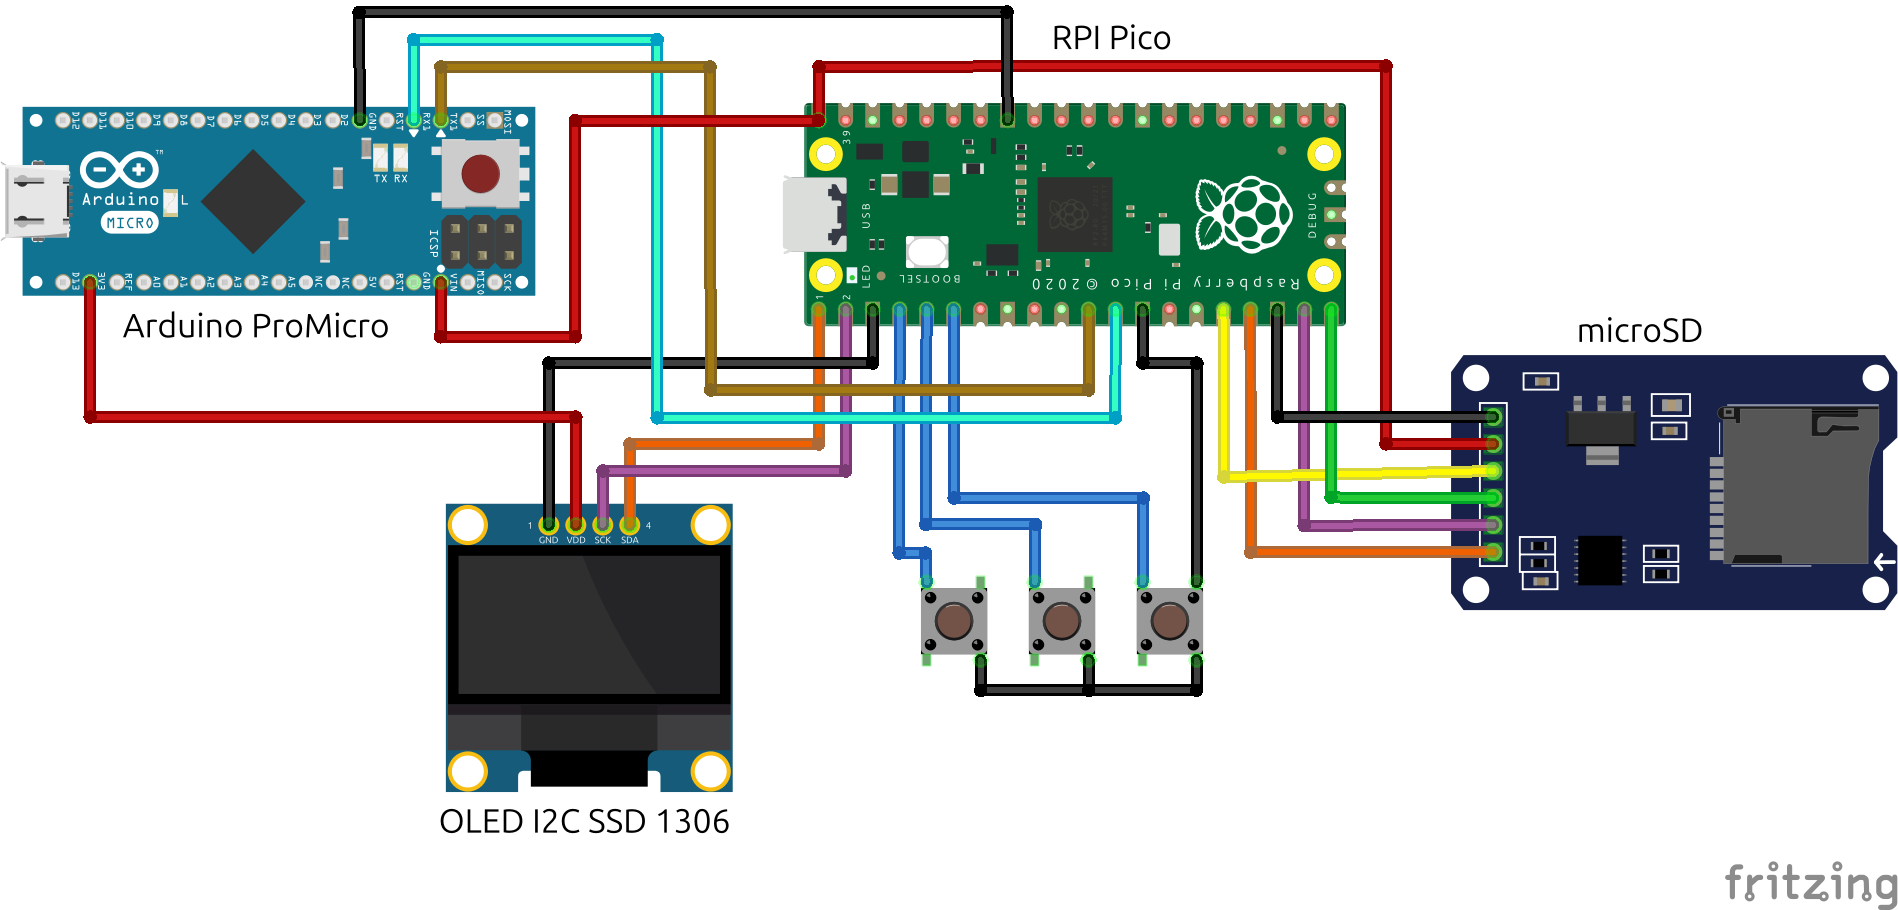
To visualize the connections, here’s a wiring diagram for the project:
Hardware Requirements
To build this project, you will need the following components:
- 1x Raspberry Pi Pico
- 1x Arduino Pro Micro (or Arduino Leonardo)
- 1x MicroSD Card Module (SPI interface)
- 1x 0.96” OLED Display (I2C - SSD1306 controller)
- 3x Push Buttons
- Jumper wires
- Breadboard or custom PCB
Wiring Guide
Connecting the components correctly is crucial for the project’s functionality. Below is a detailed wiring table:
Raspberry Pi Pico to Peripherals
| Component | Pin | Raspberry Pi Pico Pin |
|---|---|---|
| OLED | SDA | GP4 (I2C0 SDA) |
| OLED | SCL | GP5 (I2C0 SCL) |
| SD Card | CS | GP17 |
| SD Card | SCK | GP18 (SPI0 SCK) |
| SD Card | MOSI | GP19 (SPI0 TX) |
| SD Card | MISO | GP16 (SPI0 RX) |
| Buttons | UP | GP2 |
| Buttons | DOWN | GP3 |
| Buttons | SELECT | GP6 |
(All buttons should be connected between the respective GPIO pin and GND. The Pico code uses INPUT_PULLUP.)
Raspberry Pi Pico to Arduino Pro Micro Communication (UART)
| Raspberry Pi Pico Pin | Arduino Pro Micro Pin |
|---|---|
| TX (GP0) | RX (Pin 0) |
| RX (GP1) | TX (Pin 1) |
| GND | GND |
Installation & Setup
Follow these steps to set up your Dual-MCU BadUSB:
- Prepare the MicroSD Card:
- Format your MicroSD card to FAT32.
- Create your DuckyScript payloads as
.txtfiles and place them in the root directory of the SD card. Each line in these files will be a command for the BadUSB.
- Flash the Arduino Pro Micro:
- Open the
P.A.S.S(Arduino).inofile in the Arduino IDE. - Install the
HID-Projectlibrary. Go toSketch > Include Library > Manage Libraries...and search for “HID-Project”. - Select “Arduino/Genuino Micro” as your board (for Pro Micro) or “Arduino Leonardo” (if using a Leonardo board) under
Tools > Board. - Upload the code to your Pro Micro.
- Open the
- Flash the Raspberry Pi Pico:
- Open the
P.A.S.S(RPI).inofile in the Arduino IDE. - Ensure you have the
earlephilhower/arduino-picocore installed. If not, go toFile > Preferences, addhttps://github.com/earlephilhower/arduino-pico/releases/download/global/package_rp2040_index.jsonto “Additional Boards Manager URLs”, then go toTools > Board > Boards Manager...and search for “pico”. - Install required libraries:
Adafruit GFX,Adafruit SSD1306, andSD. Go toSketch > Include Library > Manage Libraries...and search for each. - Upload the code to your Raspberry Pi Pico.
- Open the
Code Explanation: Raspberry Pi Pico (P.A.S.S(RPI).ino)
The Pico code is the brain of the operation, handling user interaction, SD card management, and DuckyScript parsing. Its dual-core RP2040 microcontroller is leveraged to separate tasks, ensuring smooth operation.
1
2
3
4
5
6
7
8
9
10
11
12
13
14
15
16
17
18
19
20
21
22
23
24
25
26
27
28
29
30
31
32
33
34
35
36
37
38
39
40
41
42
43
44
45
46
47
48
49
50
51
52
53
54
55
56
57
58
59
60
61
62
63
64
65
66
67
68
69
70
71
72
73
74
75
76
77
78
79
80
81
82
83
84
85
86
87
88
89
90
91
92
93
94
95
96
97
98
99
100
101
102
103
104
105
106
107
108
109
110
111
112
113
114
115
116
117
118
119
120
121
122
123
124
125
126
127
128
129
130
131
132
133
134
135
136
137
138
139
140
141
142
143
144
145
146
147
148
149
150
151
152
153
154
155
156
157
158
159
160
161
162
163
164
165
166
167
168
169
170
171
172
173
174
175
176
177
178
179
180
181
182
183
184
185
186
187
188
189
190
191
192
193
194
195
196
197
198
199
200
201
202
203
204
205
206
207
208
209
210
211
212
213
214
215
216
217
218
219
220
221
222
223
224
225
#include <SPI.h>
#include <SD.h>
#include <Wire.h>
#include <Adafruit_GFX.h>
#include <Adafruit_SSD1306>

// Display and Pin Configuration
#define SCREEN_WIDTH 128
#define SCREEN_HEIGHT 64
#define OLED_RESET    -1
Adafruit_SSD1306 display(SCREEN_WIDTH, SCREEN_HEIGHT, &Wire, OLED_RESET);

const int chipSelect = 17; // SD Card CS pin
const int btnUp = 2;       // Up button GPIO
const int btnDown = 3;     // Down button GPIO
const int btnSelect = 6;   // Select button GPIO

// File List and Scroll Settings
#define MAX_FILES 30
#define VISIBLE_ROWS 5
String fileNames[MAX_FILES];
int fileCount = 0;
int selectedIndex = 0;
int startWindow = 0;

// Variables shared between cores (volatile for inter-core communication)
volatile bool isSending = false;
volatile bool isPaused = false;
volatile int progress = 0;
String fileToProcess = "";

// ---------------------------------------------------------
// Core 0: Menu Management, Buttons, and Display
// ---------------------------------------------------------
void setup() {
  Serial.begin(115200);   // Debug serial (USB)
  Serial1.begin(115200);  // Communication with Pro Micro (UART)
  pinMode(btnUp, INPUT_PULLUP);
  pinMode(btnDown, INPUT_PULLUP);
  pinMode(btnSelect, INPUT_PULLUP);

  // Initialize OLED display
  if(!display.begin(SSD1306_SWITCHCAPVCC, 0x3C)) { for(;;); } // Address 0x3C for 128x64

  display.clearDisplay();
  display.setTextSize(1);
  display.setTextColor(SSD1306_WHITE);
  display.setCursor(20, 25);
  display.println("BOOTING PICO...");
  display.display();

  // Initialize SD card
  if (!SD.begin(chipSelect)) {
    display.clearDisplay();
    display.setCursor(0, 0);
    display.println("SD CARD ERROR!");
    display.display();
    while(1); // Halt if SD card fails
  }

  readFilesFromSD(); // Read DuckyScript files from SD card
}

void loop() {
  display.clearDisplay();

  if (!isSending) {
    handleMenuNavigation(); // Handle button presses for menu navigation
    drawMenu();             // Draw the file selection menu
  } else {
    drawProgressUI();       // Show progress when a script is running
  }

  display.display();
  delay(30); // Refresh rate for the screen
}

void readFilesFromSD() {
  File root = SD.open("/"); // Open root directory of SD card
  fileCount = 0;
  while (true) {
    File entry = root.openNextFile();
    if (!entry || fileCount >= MAX_FILES) break; // No more files or max files reached
    if (!entry.isDirectory()) {
      fileNames[fileCount] = entry.name(); // Store file names
      fileCount++;
    }
    entry.close();
  }
}

void handleMenuNavigation() {
  if (digitalRead(btnUp) == LOW) { // Up button pressed
    if (selectedIndex > 0) {
      selectedIndex--;
      if (selectedIndex < startWindow) startWindow = selectedIndex; // Scroll up if needed
    } else {
      selectedIndex = fileCount - 1; // Wrap around to last item
      startWindow = max(0, fileCount - VISIBLE_ROWS);
    }
    delay(150); // Debounce delay
  }

  if (digitalRead(btnDown) == LOW) { // Down button pressed
    if (selectedIndex < fileCount - 1) {
      selectedIndex++;
      if (selectedIndex >= startWindow + VISIBLE_ROWS) startWindow = selectedIndex - VISIBLE_ROWS + 1; // Scroll down if needed
    } else {
      selectedIndex = 0; // Wrap around to first item
      startWindow = 0;
    }
    delay(150); // Debounce delay
  }

  if (digitalRead(btnSelect) == LOW) { // Select button pressed
    if (fileCount > 0) {
      fileToProcess = fileNames[selectedIndex]; // Get selected file name
      isSending = true; // Start sending process
      progress = 0;     // Reset progress
      delay(400);       // Debounce delay
    }
  }
}

void drawMenu() {
  display.setCursor(0, 0);
  display.println("Select Macro");
  display.println("--------------------");

  for (int i = startWindow; i < min(startWindow + VISIBLE_ROWS, fileCount); i++) {
    if (i == selectedIndex) {
      display.print("> "); // Indicate selected item
    } else {
      display.print("  ");
    }
    String name = fileNames[i];
    if (name.length() > 17) name = name.substring(0, 14) + "..."; // Truncate long names
    display.println(name);
  }

  // Scroll indicator on the right
  if (fileCount > VISIBLE_ROWS) {
    int barHeight = (VISIBLE_ROWS * 40) / fileCount;
    int barPos = (startWindow * 40) / fileCount;
    display.drawFastVLine(125, 20 + barPos, barHeight, SSD1306_WHITE);
  }
}

void drawProgressUI() {
  display.setCursor(0, 0);
  display.println(" Running Macro...");
  display.println(fileToProcess);
  display.println("--------------------");

  if (isPaused) {
    display.setCursor(25, 30);
    display.setTextSize(1);
    display.println("!! PAUSED !!");
    display.setCursor(15, 52);
    display.println("Press OK to Resume");
  } else {
    // Graphical progress bar
    display.drawRect(10, 35, 108, 10, SSD1306_WHITE);
    display.fillRect(10, 35, (progress * 108) / 100, 10, SSD1306_WHITE);
    display.setCursor(55, 48);
    display.print(progress);
    display.print("%");
  }

  if (progress >= 100) {
    display.clearDisplay();
    display.setCursor(20, 30);
    display.println("COMPLETE!");
    display.display();
    delay(1500);
    isSending = false; // Reset state after completion
  }
}

// ---------------------------------------------------------
// Core 1: File Processing, Commands, and Serial Transmission
// ---------------------------------------------------------
void setup1() {
  delay(2500); // Wait for Core 0 to initialize peripherals
}

void loop1() {
  if (isSending && fileToProcess != "") {
    File dataFile = SD.open(fileToProcess);
    if (dataFile) {
      unsigned long fileSize = dataFile.size();
      unsigned long bytesTotal = 0;

      while (dataFile.available() && isSending) {
        String line = dataFile.readStringUntil('\n');
        line.trim();
        bytesTotal += line.length() + 2; // +2 for \r\n
        // Update progress only if file size is known and not zero to avoid division by zero
        if (fileSize > 0) {
            progress = (bytesTotal * 100) / fileSize;
        }

        if (line.startsWith("DELAY")) {
          int waitTime = line.substring(6).toInt();
          delay(waitTime);
        }
        else if (line == "INTERRUPT") {
          isPaused = true;
          while (digitalRead(btnSelect) == HIGH) { delay(10); } // Wait for OK button
          delay(400); // Debounce
          isPaused = false;
        }
        else if (line.length() > 0) {
          Serial.println(line);    // Debug output to USB serial
          Serial1.println(line);   // Send command to Pro Micro via UART
          delay(100);              // Default delay between commands
        }
      }
      dataFile.close();
      progress = 100; // Ensure progress is 100% at the end
      fileToProcess = ""; // Clear file to process
    }
  }
  delay(100); // Small delay to prevent busy-waiting
}
Detailed Explanation of Key Functions:
setup()andloop()(Core 0): Initializes serial communications, OLED display, SD card, and button pins. Theloop()continuously clears and updates the display, showing either the file selection menu or the script progress.readFilesFromSD(): Scans the root directory of the SD card for.txtfiles and stores their names for display.handleMenuNavigation(): Detects button presses (Up, Down, Select) to navigate the file list and trigger script execution. It includes debounce delays to prevent multiple activations from a single press.drawMenu(): Renders the file selection menu on the OLED, highlighting the currently selected file and showing a scroll indicator if there are more files than can fit on the screen.drawProgressUI(): Displays the progress of a running script, including the file name, a graphical progress bar, and a pause indicator. Theprogressvariable is updated by Core 1.setup1()andloop1()(Core 1): These functions run on the second core of the Pico.setup1()includes a delay to allow Core 0 to initialize peripherals.loop1()is responsible for reading the selected DuckyScript file from the SD card, parsing each line, updating theprogressvariable, and sending commands to the Pro Micro viaSerial1(UART). It also handlesDELAYandINTERRUPTcommands, pausing execution if anINTERRUPTis encountered until the user presses the SELECT button.
Code Explanation: Arduino Pro Micro (P.A.S.S(Arduino).ino)
The Pro Micro code is simpler, focusing solely on receiving commands via serial and emulating keyboard inputs. It uses the HID-Project library for advanced keyboard control, which is crucial for broad compatibility, especially with finicky BIOS systems. This library provides more control over HID reports and is generally more reliable than the standard Keyboard.h for complex BadUSB applications.
1
2
3
4
5
6
7
8
9
10
11
12
13
14
15
16
17
18
19
20
21
22
23
24
25
26
27
28
29
30
31
32
33
34
35
36
37
38
39
40
41
42
43
44
45
46
47
48
49
50
51
52
53
54
55
56
57
58
59
60
61
62
63
64
65
66
67
68
69
70
71
72
73
74
75
76
77
78
79
80
81
82
83
84
85
86
87
88
89
90
91
92
93
94
95
96
97
98
99
100
101
102
103
104
105
106
107
108
109
110
111
#include "HID-Project.h"

void setup() {
  Serial1.begin(115200); // Initialize hardware serial for communication with Pico
  BootKeyboard.begin();  // Start the keyboard emulation
}

void loop() {
  if (Serial1.available() > 0) { // Check if data is available from Pico
    String line = Serial1.readStringUntil(\'\\n\'); // Read until newline character
    line.trim(); // Remove leading/trailing whitespace

    if (line.startsWith("STRING ")) {
      BootKeyboard.print(line.substring(7)); // Type the string after "STRING "
    }
    else if (line.startsWith("KEY ")) {
      pressSpecialKey(line.substring(4), true); // Press and release a single key
    }
    else if (line.startsWith("COMBO ")) {
      processCombo(line.substring(6)); // Process a combination of keys
    }
  }
}

// Function to process combination keys (e.g., CTRL ALT DEL)
void processCombo(String keys) {
  int start = 0;
  int end = keys.indexOf(\' \');

  while (end != -1) {
    pressSpecialKey(keys.substring(start, end), false); // Press and hold each key
    start = end + 1;
    end = keys.indexOf(\' \', start);
  }
  // Press the last key in the line
  pressSpecialKey(keys.substring(start), false);

  delay(50); // Short delay to ensure keys are registered by the system
  BootKeyboard.releaseAll(); // Release all pressed keys
}

// Function to convert key names to HID keycodes and press/release
void pressSpecialKey(String key, bool release) {
  key.toUpperCase(); // Convert key name to uppercase for consistent matching

  KeyboardKeycode k = (KeyboardKeycode)0; // Initialize keycode

  // Map common key names to HID keycodes
  if (key == "ENTER") k = KEY_ENTER;
  else if (key == "ESC") k = KEY_ESC;
  else if (key == "BACKSPACE") k = KEY_BACKSPACE;
  else if (key == "TAB") k = KEY_TAB;
  else if (key == "SPACE") k = KEY_SPACE;
  else if (key == "PRINTSCREEN") k = KEY_PRINTSCREEN;
  else if (key == "SCROLLLOCK") k = KEY_SCROLL_LOCK;
  else if (key == "PAUSE") k = KEY_PAUSE;
  else if (key == "INSERT") k = KEY_INSERT;
  else if (key == "HOME") k = KEY_HOME;
  else if (key == "PAGEUP") k = KEY_PAGE_UP;
  else if (key == "PAGEDOWN") k = KEY_PAGE_DOWN;
  else if (key == "DELETE") k = KEY_DELETE;
  else if (key == "END") k = KEY_END;
  else if (key == "RIGHT") k = KEY_RIGHT_ARROW;
  else if (key == "LEFT") k = KEY_LEFT_ARROW;
  else if (key == "DOWN") k = KEY_DOWN_ARROW;
  else if (key == "UP") k = KEY_UP_ARROW;
  else if (key == "NUMLOCK") k = KEY_NUM_LOCK;
  else if (key == "CAPSLOCK") k = KEY_CAPS_LOCK;
  else if (key == "CTRL") k = KEY_LEFT_CTRL;
  else if (key == "SHIFT") k = KEY_LEFT_SHIFT;
  else if (key == "ALT") k = KEY_LEFT_ALT;
  else if (key == "GUI") k = KEY_LEFT_GUI;
  else if (key == "RCTRL") k = KEY_RIGHT_CTRL;
  else if (key == "RSHIFT") k = KEY_RIGHT_SHIFT;
  else if (key == "RALT") k = KEY_RIGHT_ALT;
  else if (key == "RGUI") k = KEY_RIGHT_GUI;
  else if (key == "F1") k = KEY_F1
  else if (key == "F2") k = KEY_F2
  else if (key == "F3") k = KEY_F3
  else if (key == "F4") k = KEY_F4
  else if (key == "F5") k = KEY_F5
  else if (key == "F6") k = KEY_F6
  else if (key == "F7") k = KEY_F7
  else if (key == "F8") k = KEY_F8
  else if (key == "F9") k = KEY_F9
  else if (key == "F10") k = KEY_F10
  else if (key == "F11") k = KEY_F11
  else if (key == "F12") k = KEY_F12

  // Map alphanumeric characters to HID scan codes
  // This section ensures Linux systems correctly register physical key presses
  else if (key.length() == 1) {
    char c = key[0];
    if (c >= \'A\' && c <= \'Z\') {
      // In HID standard, \'A\' is code 4, \'B\' is 5, ..., \'Z\' is 29.
      k = (KeyboardKeycode)(4 + (c - \'A\'));
    } else if (c >= \'1\' && c <= \'9\') {
      k = (KeyboardKeycode)(30 + (c - \'1\'));
    } else if (c == \'0\') {
      k = (KeyboardKeycode)39;
    }
  }

  if (k != (KeyboardKeycode)0) {
    if (release) BootKeyboard.write(k); // Press and release
    else {
      BootKeyboard.press(k); // Press and hold
      delay(20); // Critical delay for Ubuntu between key presses in a combo
    }
  }
}
Detailed Explanation of Key Functions:
setup()andloop(): Initializes serial communication with the Pico and starts theBootKeyboardHID service. Theloop()continuously checks for incoming serial data from the Pico.processCombo(String keys): This function is crucial for handling key combinations. It parses a space-separated string of key names, presses each key, introduces a smalldelay(50)to ensure the operating system registers the combination, and thenBootKeyboard.releaseAll()keys. This is vital for commands likeCTRL ALT DEL.pressSpecialKey(String key, bool release): This function maps human-readable key names (e.g., “ENTER”, “CTRL”, “A”) to their correspondingKeyboardKeycodevalues. It supports both pressing and holding (release = false) and pressing and releasing (release = true) a key. Thedelay(20)within theelseblock is specifically added to ensure proper registration of sequential key presses, especially on Linux systems like Ubuntu, which can sometimes miss rapid key events in HID emulation.
Supported DuckyScript Commands
Your .txt files on the SD card should contain commands in the following format. These commands are parsed by the Pico, and then translated into serial messages for the Pro Micro to execute.
STRING <text>: Types the specified text. Example:STRING hello worldKEY <key_name>: Presses and immediately releases a single key. Example:KEY ENTER,KEY ESC,KEY A,KEY 1COMBO <key1> <key2> ...: Presses multiple keys simultaneously, holds them briefly, and then releases all. Useful for modifier combinations. Example:COMBO CTRL ALT DELETE,COMBO GUI RDELAY <time_in_ms>: Pauses execution for the specified milliseconds. This command is handled directly by the Pico. Example:DELAY 1000(for 1 second)INTERRUPT: Pauses script execution until the Pico’s Select button is pressed again. This is a custom command handled directly by the Pico, providing a way to manually control script flow.
Supported key_name values for KEY and COMBO commands: ENTER, ESC, BACKSPACE, TAB, SPACE, PRINTSCREEN, SCROLLLOCK, PAUSE, INSERT, HOME, PAGEUP, PAGEDOWN, DELETE, END, RIGHT, LEFT, DOWN, UP, NUMLOCK, CAPSLOCK,F1-F12 .
Modifier Keys (for KEY and COMBO): CTRL, SHIFT, ALT, GUI (Windows Key). Also RCTRL, RSHIFT, RALT, RGUI for right-side modifiers.
Alphanumeric Keys: Single letters (A-Z) and numbers (0-9) are also supported directly as key_name (e.g., KEY A, COMBO CTRL C).
Use Case: HPE Server Automation
This project was born out of a practical need to streamline server management. By creating DuckyScript files that contain sequences of keystrokes to navigate BIOS menus, configure settings, and initiate factory resets, this Dual-MCU BadUSB significantly reduces the manual effort and time required for maintaining large server deployments. It’s an invaluable tool for system administrators dealing with legacy hardware or environments where traditional remote management tools are not feasible during initial setup.
Security Considerations
While this tool was built for legitimate system administration, BadUSB devices are inherently dual-use. It’s critical to understand the security implications and use such tools responsibly.
- Physical Security: The primary defense against BadUSB attacks is physical security. Restrict physical access to critical servers and workstations.
- USB Port Control: Many modern operating systems and endpoint protection solutions allow administrators to restrict or monitor USB device connections based on Vendor ID (VID) and Product ID (PID).
- Awareness: Educate staff about the dangers of plugging in unknown USB devices.
Disclaimer: This project is documented for educational purposes and authorized automation tasks only. Always ensure you have explicit, written permission before using BadUSB devices on any system or network. Misuse of such tools can lead to severe legal and professional consequences.
Conclusion
This Dual-MCU BadUSB project demonstrates a robust solution for automating complex tasks on challenging hardware environments like legacy HPE servers. By intelligently combining the Raspberry Pi Pico’s versatility for UI and SD card management with the Arduino Pro Micro’s reliable HID emulation, we’ve created a powerful, adaptable tool. This project not only solves a specific IT automation problem but also serves as an excellent example of how different microcontrollers can be synergistically employed to overcome individual limitations. Remember to always use such tools responsibly and ethically.